Background
When converting PowerBuilder 2025 applications from workspace format to solution format, users need to disable source control and create a new repository.
Resolution
For users who need to preserve their source control history, this article provides the following approaches:
- Automated approach (using a batch file)
Please refer to the section that best fits your scenario.
Steps to preserve history when converting workspace to solution
If the PBL files have already been uploaded to source control, they must be deleted first and the deletion must be committed to the source control server.
- Steps for SVN batch processing
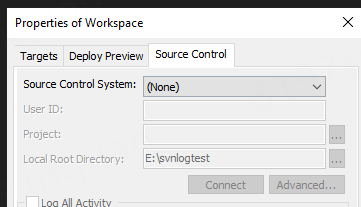
Step 1 – Disable SVN source control
Change Source Control System to (None) and click the OK button. Then convert your application to solution.
Step 2 - Execute the Batch file
Add svn.exe into environment variables first. You can download svn.exe from Download VisualSVN.
Then execute the Batch file that contains the following content. Note that you need to modify the svn_work value to your project directory first.
@echo off rem the directory of your application @set svn_work=D:\setlocal enabledelayedexpansion rem If the PBL files have already been uploaded to SVN, they must be deleted first and the deletion must be committed to the SVN server. rem Note that the application should have been converted to solution. cd /D %svn_work% rem Move .svn and ws_objects. Make sure the source code record is at the same SVN path as the solution project. cd /D %svn_work% PowerShell -C "mv '_BackupFiles\.svn' '%svn_work%' -Force" move "_BackupFiles\ws_objects" "%svn_work%" copy "_BackupFiles\*.pbw" "%svn_work%" copy "_BackupFiles\*.pbt" "%svn_work%" rem Execute SVN Rename to remove .src so that the solution project can reference the source code repository. cd /d %svn_work%\ws_objects echo svn Rename for /d %%D in (*.pbl.src) do ( set "oldname=%%D" set "newname=!oldname:.pbl.src=.pbl!" echo renaming %%D to !newname! svn rename "%%D" "!newname!" ) svn commit -m "rename pbl" echo Rename final cd / %svn_work% rem Overwrite the source object with the solution object, as the source object includes an export header and therefore cannot be used directly. for /d %%E in (*.pbl) do ( move /y "%svn_work%\%%E\*.*" "%svn_work%\ws_objects\%%E\" ) echo svn replace svn commit -m "pbl object replace" echo replace final rem Delete PBL and move the PBL directory. cd /d %svn_work%\ for /d %%F in (*.pbl) do ( rd /S /Q "%%F" ) cd /d %svn_work%\ws_objects echo svn move svn update for /d %%G in (*.pbl) do ( svn move "%%G" "%svn_work%\%%G" ) rem Delete ws_objects,*.pbw,*.pbt. cd /d %svn_work%\ svn delete "ws_objects" for %%H in (*.pbw) do ( svn delete "%%H" ) for %%J in (*.pbt) do ( svn delete "%%J" ) svn commit -m "move pbl" echo move final pause
Step 3 - Enable SVN source control
Follow the same steps as described earlier. Open the solution in the PowerBuilder IDE. Right-click the solution and select Properties to open the Solution Properties window. On the Source Control tab, change the Source Control System from (None) to Subversion (SVN).
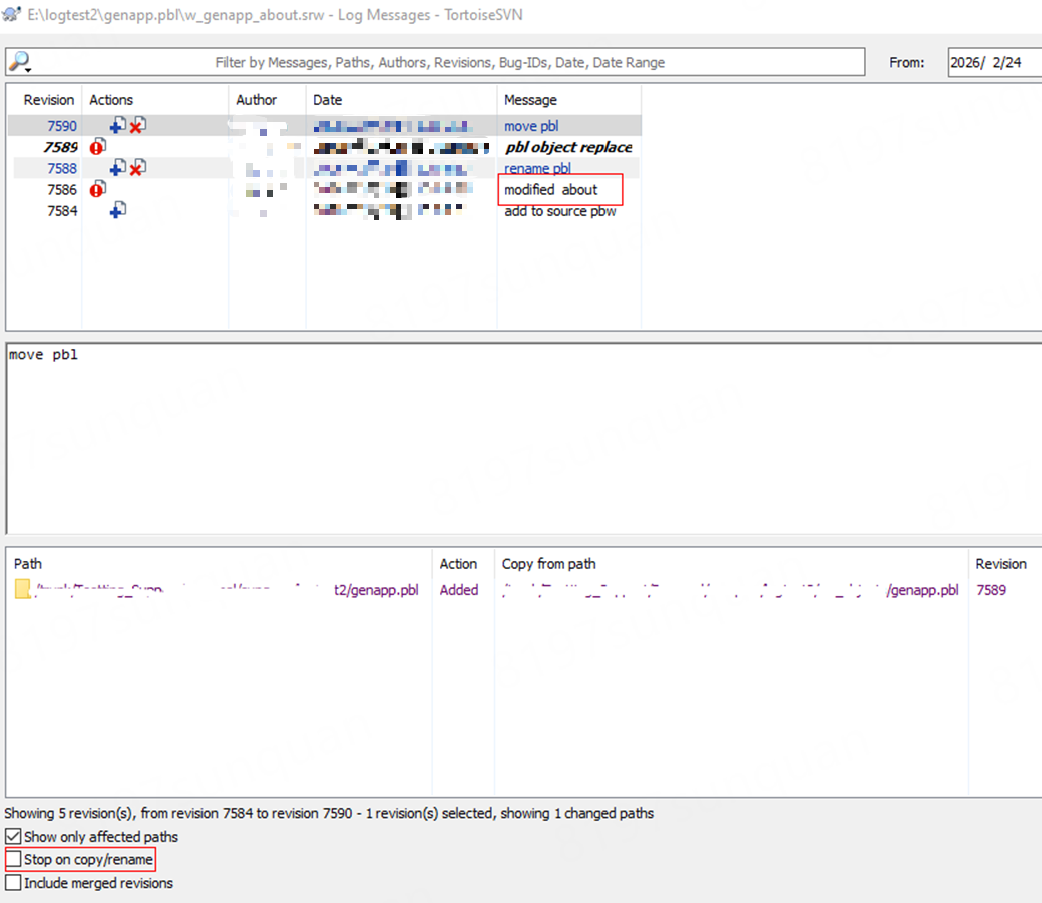
Step 4 - Check History
Try checking the submission history of each object and checking the history record after un-selecting "Stop on copy/rename".
- Steps for Git batch processing
Step 1 - Disable Git source control
Right-click on the root node of the System Tree and select Properties. Open the Properties of Workspace window and go to the Source Control tab. Change Source Control System from Git to (None) and click the OK button.
Step 2 – Convert the application to solution
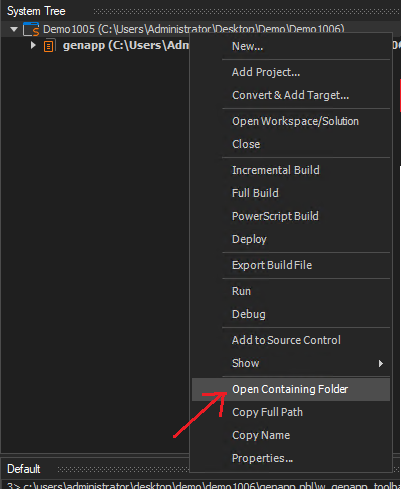
Right click on the root node of the application and select Convert Workspace to Solution, and then wait for the conversion to complete.

After the conversion, open the containing folder of the solution project.
Step 3 - Execute the Batch file
Execute the Batch file that contains the following content in Command Prompt. Note that you need to modify the git_work value to your project directory first.
@echo off rem The directory of your application. @set git_work=C:\setlocal enabledelayedexpansion rem If the PBL files have already been uploaded to Git, they must be deleted first and the deletion must be committed to the Git server. rem Note that the application should have been converted to solution. cd /d %git_work% rem Move .git and ws_object. Make sure the source code record is at the same Git path as the solution project. PowerShell -C "mv '_BackupFiles\.git' '%git_work%' -Force" move "_BackupFiles\ws_objects" "%git_work%" rem Execute Git Rename to remove .src so that the solution can reference the source code repository. cd /d %git_work%\ws_objects echo git Rename git update-git-for-windows for /d %%D in (*.pbl.src) do ( set "oldname=%%D" set "newname=!oldname:.pbl.src=.pbl!" echo renaming %%D to !newname! git mv "%%D" "!newname!" ) git commit -m "rename pbl" echo Rename final cd /d %git_work% rem Overwrite the source object with the solution object, as the source object includes an export header and therefore cannot be used directly. for /d %%E in (*.pbl) do ( move /y "%git_work%\%%E\*.*" "%git_work%\ws_objects\%%E\" ) echo git replace git commit -m "pbl object replace" echo replace final rem Delete PBL and move the PBL directory. cd /d %git_work%\ for /d %%F in (*.pbl) do ( rd /S /Q "%%F" ) cd /d %git_work%\ws_objects echo git move git update-git-for-windows for /d %%G in (*.pbl) do ( git mv "%%G" "%git_work%\%%G" ) cd /d %git_work%\ rmdir /s /q ws_objects git commit -m "move pbl" echo move final
Step 4 - Enable Git source control
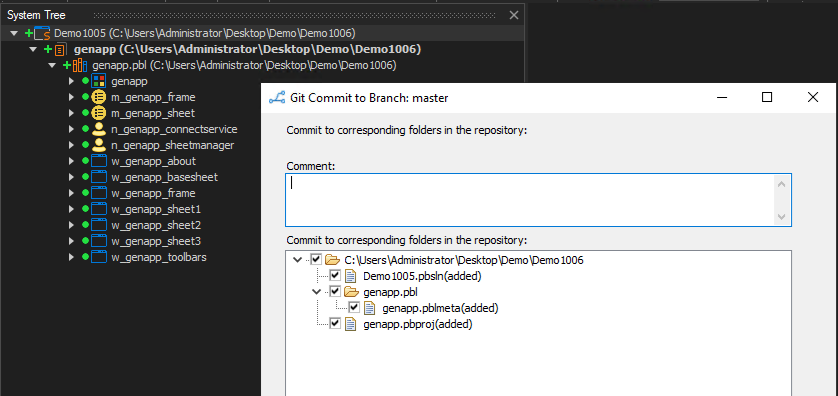
Open the solution in PowerBuilder IDE. Right-click on the root node of the solution and open the Properties of Solution window. On the Source Control tab, change Source Control System from (None) to Git.
Right-click on the root node of the solution on the System Tree and commit.
Step 5 – Check the history
Right-click on the solution and select "Git Show Log" to check the history records.