For .NET IIS (on Windows)
May 27, 2019
1. Introduction
2. System Requirements
3. Installing or Upgrading PowerServer (PB Edition) 2019
4. Activating PowerServer (PB Edition) 2019
5. Uninstalling PowerServer (PB Edition) 2019
Appendix A - Windows Server 2016 / 2012 / 2008 R2 Additional Setup
1. Introduction
1.1 Welcome to PowerServer (PB Edition) 2019
Welcome to PowerServer (PB Edition) 2019!
PowerServer extends the capabilities of PowerBuilder so that a PowerBuilder application can be deployed and run on the mobile device or in the Web browser. The deployment process produces a true native mobile and/or application with a .NET-based back-end and a modern UI front-end.
1.2 Components of the product
PowerServer (PB Edition) 2019 consists of four major components or parts: PowerServer Toolkit, PowerServer .NET, PowerServer Web Component, and PowerServer Help.
- PowerServer Toolkit is a plug-in to the PowerBuilder IDE installed to the developer's PC. It provides a set of tools that enable the entire PowerBuilder-to-mobile or PowerBuilder-to-Web conversion process to take place within the PowerBuilder IDE.
- PowerServer .NET is a set of server components that deploy to the .NET IIS application server. It provides the necessary run-time services for the mobile/Web applications.
- PowerServer Web Component contains the common runtime libraries that deploy to a third-party Web server. If the developer would like to use the built-in Web Server, this installation component is not required, which occurs frequently until the application is ready to be deployed into production servers.
- PowerServer Help contains all relevant information for using PowerServer (PB Edition) 2019.
1.3 64-bit Version of the product
By default, this readme is targeted to users who want to install a 32-bit version of the product, but if you want to install a 64-bit version of the product, please notice the following major differences between them:
- The 64-bit version consists of PowerServer only.
- The 64-bit version requires both the application server and the operating system to be 64-bit compatible, otherwise, the product cannot be installed.
- The 64-bit version requires the 64-bit database driver to be installed to the application server.
2. System Requirements
Before installing PowerServer (PB Edition) 2019, please ensure that your system meets the requirements below:
Mobile device
-
Apple iOS 10, 11, or 12 on iPad Mini/Air, iPad Pro 12.9-inch, or iPhone 7/8/X/Xs/Xs Max/XR., or
- Google Android 6.x (32-bit), 7.x, 8.x, or 9.x on the recent and popular Samsung phones and tablets
Web client PC
-
Microsoft Internet Explorer 11, Microsoft Edge (27 thru 40), Mozilla Firefox (50 thru 63), Google Chrome (50 thru 70), or Opera (45 thru 56)
- Windows 7, Windows 8.1, or Windows 10
PowerServer Toolkit
-
Appeon PowerBuilder 2019
- Microsoft Windows Server 2016, 2012 R2, or 2008 R2
- Microsoft
IIS 7.5, 8.0, or 10
It is highly recommended you follow server settings to ensure the IIS server is configured properly for PowerServer, before installing PowerServer. - Microsoft .NET Framework 4.x
Web Server (for .NET)
- Microsoft IIS 7.5, 8.0, or 10
DBMS (for .NET)
- SAP SQL Anywhere 8.0.2, 9.0, or 10.0.1 with ODBC Driver
- SAP SQL Anywhere 11.0, 12.0, 16.0, or 17.0 with SQL Anywhere .NET Data Provider
- SAP HANA 1.00.36 with ODBC Driver
- SAP Adaptive Server Enterprise (ASE) 12.5.x or 15.x with ASE Native Driver
- IBM DB2 UDB 9.7 with IBM DB2 native driver
- Informix 7.x, 8.x, 9.x, 10.x, or 11 with IBM Informix .NET Provider
- Microsoft SQL Server 2000 SP4, 2005 SP1, 2008, 2012, 2014, or 2016 with MS SQL Server Native Driver
- MySQL 5.5.x or 5.6.x with ADO.NET Data Provider
- Oracle 8i, 9i, 10g, 11g, or 12c with Oracle Native Driver
- Teradata 13.1.0.0 with Teradata .NET Data Provider driver
- PostgreSQL 9.2 with PostgreSQL psqlODBC driver
3. Installing or Upgrading PowerServer (PB Edition)
PowerServer (PB Edition) 2019 is provided as part of the Appeon PowerBuilder 2019 Universal Edition installation package, therefore, you can run the PowerBuilder setup program and select to install PowerBuilder as well as PowerServer. For more information, refer to the "Installing PowerBuilder 2019" section in the PowerBuilder readme file.
4. Activating PowerServer (PB Edition)
You are required to activate PowerServer first before using it. If you do not have a valid account to log in and activate PowerServer, please contact your license administrator to create an account for you. And depending on whether the machine where PowerServer is installed has Internet access or not, the account should be assigned with an online license or offline license by your license administrator.
For how to activate PowerServer (PB Edition) 2019, refer to the "Activating PowerServer (PB Edition)" section in the Appeon License User Guide.
5. Uninstalling PowerServer (PB Edition)
To uninstall the PowerServer Toolkit, launch Add/Remove Programs in the Windows Control Panel. Select PowerServer Toolkit and click the Change/Remove button to begin the uninstall process.
To uninstall the PowerServer, launch Add/Remove Programs in the Windows Control Panel. Select PowerServer and click the Change/Remove button to begin the uninstall process.
To uninstall the PowerServer Web Component, launch Add/Remove Programs in the Windows Control Panel. Select PowerServer Web Component and click the Change/Remove button to begin the uninstall process.
To uninstall the PowerServer Help, launch Add/Remove Programs in the Windows Control Panel. Select PowerServer Help and click the Change/Remove button to begin the uninstall process.
Appendix A - Windows Server 2016 / 2012 / 2008 R2 Additional Setup
The following configurations are required for Windows Server 2016 + IIS 10.0, Windows Server 2012 + IIS 8.0, or Windows Server 2008 R2 + IIS 7.5; if your application is deployed to a Web server running on the aforementioned environment, please be sure to follow the instructions below after you deploy the application.
Step 1: Find out what files of the application cannot be downloaded in Windows Server 2016, 2012, or 2008 R2.
1. Go to AEM | Application | Client Features, set Allow user to select run mode to Yes.

2. On the same AEM page, find out where the local application files are stored. For example: C:\Users\appeon\AppData\Roaming\appeon
3. Delete the local folder for the application files. The folder is named after the application, for example, C:\Users\appeon\AppData\Roaming\appeon\localhost_Dotnet_<application-name>.
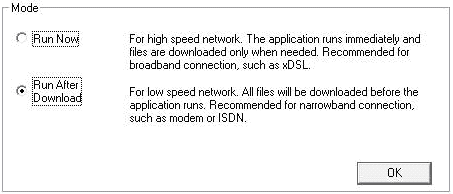
4. Access the application in IE, and select Run After Download.
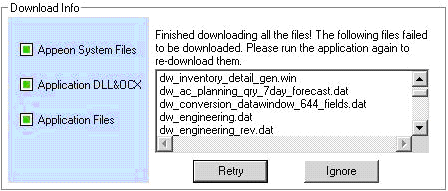
5. In the Download Info window, make note of the type of files that cannot be downloaded, as you will then need to specify them in IIS explicitly.
In the most common case, the following files fail to be downloaded:
Files with file extension, but not specified in IIS.
Files without file extension.
Step 2: Set up the MIME types for files with file extension that cannot be downloaded.
1. Open IIS Manager, and navigate to the Web Site hosting the application, then navigate to the application folder, and then click the sub-folder which contains the files that cannot be downloaded.
The following table lists the sub-folder and what types of files they contain, so you can easily determine which folder you will need to configure.
|
File type |
Folder name |
|
*.dat |
located in the meta/merge folder. |
|
*.win, *.udo |
located in the ole folder. |
|
*.dll, *.ocx |
located in the plugin folder. |
|
*.bmp, *.jpg, *.ico |
located in the image folder. |
|
f* |
located in the merge folder. |
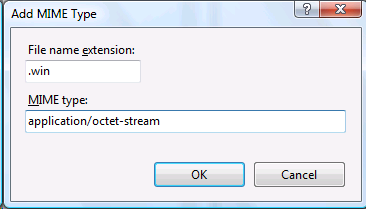
Suppose the *.win file cannot be downloaded, then click the ole folder.
The following steps take the file extension .win as an example to show you how to create the MIME type for this file type. You may need to create multiple MIME types if there were more than one type of file extension listed from step 1.
2. In Features View, double-click MIME Types.
3. In the Actions pane, click Add.
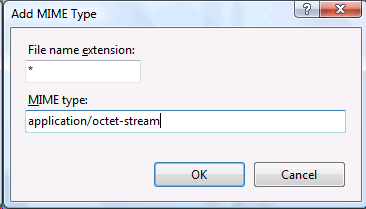
4. In the Add MIME Type dialog box, fill in the fields with the following values:
File name extension: .win (or whatever the extension names were of the objects that were listed in the Download info screen from step 1.)
MIME type: application/octet-stream
5. Click OK.
Step 3: Set up both MIME type and Handler Mapping for files without file extension that cannot be downloaded.
1. Open IIS Manager, and navigate to the Web Site hosting the application, then navigate to the application folder, and then click the merge folder.
2. In Features View, double-click MIME Types. Then in the Actions pane, click Add. Then in the Add MIME Type dialog box, set File name extension to * and set MIME type to application/octet-stream. Click OK.
3. Click the merge folder again and then double click Handler Mapping in Features View.
The following steps take the file name f### (where ### is a number) as an example to show you how to create the mappings for this file group. You may need to create multiple mappings if there were more than one group of these files listed from step 1.
4. Click Add Module Mapping in the Actions pane, and then in the Add Module Mapping dialog box, fill in the fields with the following values:
Request path: f* (or whatever the names were of the objects that were listed in the Download info screen from step 1.)
Module: StaticFileModule, DefaultDocumentModule, DirectoryListingModule
Name: v (you can put whatever name you want here, as long as it does not conflict with an already existing mapping.)

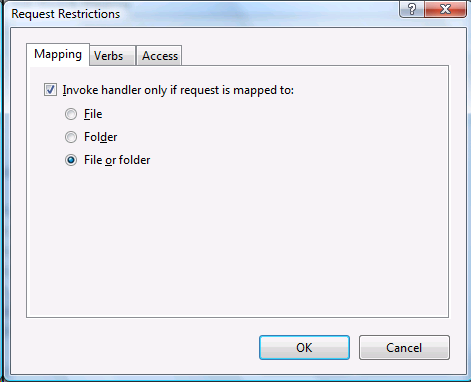
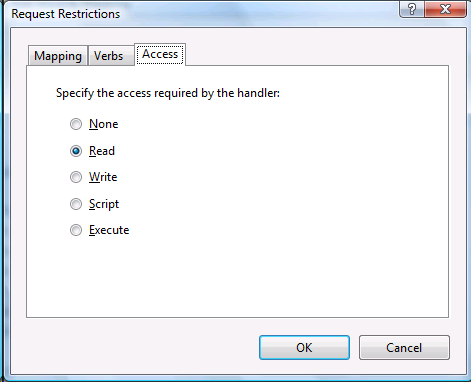
5. Then click the Request Restrictions button; in the Mapping tab, check the box and select File or folder, and in the Access tab, select Read.
6. Click OK to complete the setup, the mapping will be listed as shown below.

7. Restart IIS.
Copyright © Appeon. All rights reserved. Terms of Use | Privacy Statement