A server profile is a set of parameters for Appeon Developer to connect to, and deploy applications to, a particular Appeon Server or Web server. Creating and using server profiles is the easiest way to manage your application deployments because you can:
-
Select one or more Appeon Server profiles and Web Server profiles to set up a deployment profile.
-
Easily add, edit, and remove server profiles.
-
Test connections in server profiles. If the connection is successful, it means that the application can be deployed to the server configured in the server profile.
-
Manage which applications are accessible from the Appeon Developer shortcut Run button. The shortcut lists the applications that are deployed to the default server profiles.
There are two main parts on the Server Profiles tab page, as shown in the following figure. The upper part is for management of Appeon Server profiles, while the lower part is for management of Web server profiles.
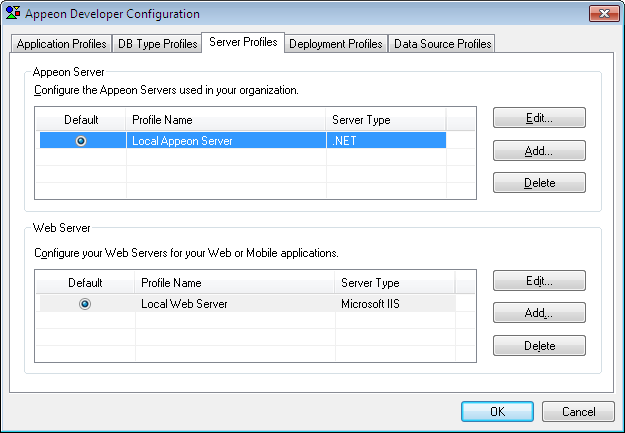
You can select an Appeon Server profile or a Web Server profile as the DEFAULT server profile on the Server Profiles tab page. Appeon Developer's Run shortcut reads the default server profiles and lists the applications that are deployed to default server profiles, enabling you to quickly access them. Applications that are deployed to non-default server profiles are not available in the shortcut. For details about the shortcut, refer to Running Appeon Applications.
Two sets of Edit, Add, and Delete buttons are available on the Server Profiles tab page for you to modify, create, or remove Appeon Server or Web Server profiles. the section called “Appeon Server profile settings” and the section called “Web Server profile settings” provide instructions on how to configure the properties for an Appeon Server or Web Server profile when you modify or create a new server profile.
Before you edit or add an Appeon Server profile, make sure that the Appeon Server specified in the profile is running, and that the Appeon Developer computer can successfully connect to the Appeon Server computer.
If you want to deploy the application to an Appeon Server cluster, you must create profiles for each participating Appeon Server and deploy the application to all Appeon Servers in the cluster.
The following figure shows the Appeon Server Profile Configuration window that displays when you click the Edit or Add button in the Appeon Server group box of the Server Profiles tab page.
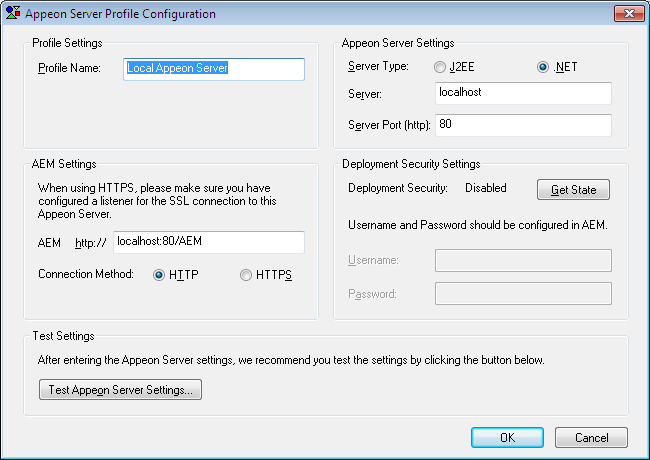
The following table lists detailed instructions on how to specify the properties for an Appeon Server profile.
Table 14. Appeon Server profile properties
|
|
Property |
Instructions |
|---|---|---|
|
Profile Settings |
Profile Name |
Assign a name to the Appeon Server profile. You should use names that are easy to remember and identify (for example "Appeon Server for Test" or "Remote Appeon Server"). |
|
Appeon Server Settings |
Server Type |
Select J2EE if Appeon Server is installed to EAServer, JBoss, JEUS, WebLogic, NetWeaver, or WebSphere; select .NET if Appeon Server is installed to Microsoft .NET Framework. |
|
Server |
Enter the IP address or the machine name of the Appeon Server. |
|
|
Server Port (http) |
Enter the HTTP port number used by Appeon Server. Note: Do not enter an HTTPS port here, Appeon Developer must use an HTTP port to connect with Appeon Server, though the Appeon deployed application can be connected with an HTTPS port. |
|
|
AEM Settings |
AEM URL |
The URL for Appeon Enterprise Manager (AEM) will be automatically generated after you specify the Server and Server Port. The URL will be in the following format: http://server:port/AEM, (for example, http://localhost:9988/AEM). Note: 1) If you use EAServer as Appeon Server, the Appeon installation program creates an HTTP listener (localhost: 9988) for Appeon Server. If the Appeon Server configured is a local computer, the following URL should always work: http://localhost:9988/AEM. 2) Do not use a "localhost" listener in a production environment. |
|
Connection method |
Select HTTP or HTTPS to connect to AEM. If the Web server is configured as an SSL Web Server, check the HTTPS (secure) option. Otherwise, check the HTTP (insecure) option. |
|
|
Deployment Security Settings |
Deployment Security |
The Get State button can get the state of the Deployment Security settings in AEM. If Deployment Security is set to ON, the state will be "Enabled" and you must specify the deployment user name and password. By default, the Deployment Security in AEM is OFF, so the state is "Disabled". |
|
Username |
Enter the username used to deploy the application. The username and password for the deployment security feature are configured in Appeon Enterprise Manager (AEM). The username can be left blank if the deployment security feature is turned off in AEM. |
|
|
Password |
Enter the password used to deploy the application. The username and password for the deployment security feature are configured in AEM. The password can be left blank if the deployment security feature is turned off in AEM. |
After profile configuration, perform the following steps to make sure the Appeon Server profile can be successfully used for application deployments:
-
Check whether the deployment security settings are configured correctly. The username and password in the deployment security settings must be the same as those configured in AEM. Make sure you get the correct deployment username and password from the AEM administrator.
-
Test Appeon Server settings by clicking the Test Appeon Server Settings button. Do NOT proceed to the next step until the testing succeeds.
Before you edit or add a Web Server profile, make sure the Web Server specified in the profile is running and that the Appeon Developer computer can successfully connect to the Web Server computer.
The following figure shows the Web Server Profile Configuration window that displays when you click the Edit or Add button in the Web Server group box of the Server Profiles tab page.
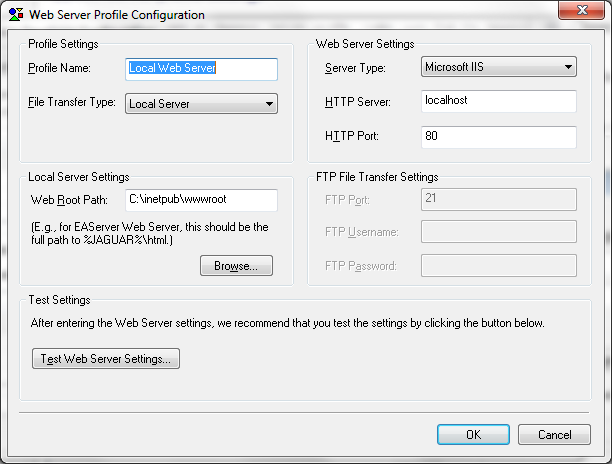
The following table lists detailed instructions for how to specify the properties for a Web Server profile.
Table 15. Instructions for creating a Web Server profile
|
|
Property |
Instructions |
|---|---|---|
|
Profile Settings |
Profile Name |
Assign a name to the Web Server profile. You should use names that are easy to remember and identify such as "Web Server for Test" or "Production Web Server". |
|
File Transfer Type |
Use Local Server if the Web Server is on the local machine. Use Remote Server if the Web Server locates remotely. |
|
|
Web Server Settings |
Server Type |
Select the Web server type. Appeon supports the following Web Server types: Apache, EAServer, IIS, JBoss, WebLogic, WebSphere, NetWeaver, and JEUS. |
|
HTTP Server |
Enter the IP address or the machine name of Web Server. |
|
|
HTTP Port |
Enter the Web Server port number. Note: Do not enter an HTTPS port here, even though the Web server is configured as an SSL Web server, because Appeon Developer must use an HTTP port to connect with Web server. However, you can access the deployed application with the HTTPS port. |
|
|
Local Server Settings |
Web Root Path |
Enter the home directory of the Web server (for example: for Apache, the home directory is <apache root>\htdocs for EAServer, the home directory is C:\Program Files\Sybase\EAServer6\html; for IIS, the home directory is C:\Inetpub\wwwroot; for JBoss 5, the home directory is <jboss5 root>\server\<instance name>\deploy; for JBoss 7, the home directory is <jboss7 root>\standalone\deployments; for WebLogic 8, the home directory is C:\bea\user_projects\domains\appeon_domain\applications; for WebLogic 9/10, the home directory is C:\bea\user_projects\domains\appeon_domain\autodeploy; for WebSphere, the home directory is C:\IBM\WebSphere6\AppServer\installableApps; for JEUS, the home directory is
For NetWeaver Application Servers, specify any path and then deploy the War file in the NetWeaver's administrative console. Click the Browse button to select the home directory of the Web server. |
|
FTP File Transfer Settings |
FTP Port |
Enter the FTP server port number. The typical FTP port is port 21. If you use a remote Web Server, Appeon Developer will upload the files to Web Server using FTP protocol. Note that Appeon Developer works as a passive FTP client when uploading files. So you need to make sure that you are using passive FTP and the FTP data port and command port are configured properly in the firewall. |
|
FTP Username |
Enter the username for FTP login. If the FTP server offers anonymous access then the username should be anonymous. |
|
|
FTP Password |
Enter the password for FTP login. If no password is set for the FTP server or the FTP Username is anonymous, leave this field blank. |
After the profile configuration, perform the following steps to make sure the Web Server profile can be successfully used for application deployments:
-
Test Web Server settings by clicking the Test Web Server Settings button. Do NOT proceed to the next step until the testing succeeds.
If the Web Server is a remote server, refer to the section called “Two requirements for FTP settings” to make sure the configuration for the Web Server profile is successful.
If the Web Server is an SSL Web server, refer to the section called “If the Web Server is an SSL Web Server” to make sure the configuration for the Web Server profile is successful.
If you configure a Web Server profile for a remote Web Server, make sure the FTP settings in the Web Server profile meet the following two requirements:
-
The user name and password for accessing the FTP server should have permission to read and write files to the FTP server of the Web Server.
-
The FTP home directory should be mapped to the Web root of the Web Server.
The following steps use the Microsoft IIS FTP service as an example to show you how to fulfill the requirements. You should find that the settings for other FTP types are similar to the settings for Microsoft IIS FTP.
Step 1: On the FTP server (Web Server), open the Internet Services Manager in Administrative Tools, as shown in the following figure.
Step 2: Right click on Default FTP Site and select Properties in the popup menu. The Default FTP Site Properties window is displayed.
Step 3: Go to the Home Directory tab and verify that:
-
The Local Path is the full path to the Web Server document root.
-
The Write property of the FTP Site Directory is enabled.
Step 4: Go to the Directory Security tab and verify that the Granted Access option is checked, as shown in the following figure.
If the Web Server is an SSL or secure Web Server, you can configure the Web Server profile following the configuration instructions for non-SSL Web Servers, except for the following two points:
-
You need to configure an HTTPS listener and port number for the Web Server.
-
You must specify an HTTP (not HTTPS) listener and its port number in the HTTP server settings of the Web Server profile, because Appeon Developer must use the HTTP protocol when deploying the Appeon application files to the server. After the application is deployed to the Web server, you can input "https" instead of "http" and the HTTPS port in the URL to access the application, (for example, https://192.0.0.80:8181/appeondemo/).
